

Communication via API
The front-end and back-end must be able to exchange data between each other, and that’s exactly what an API – Application Programming Interface – is for. Simply put, an API allows the features of one application (for example, reading data) to be used somewhere else. You’ve probably seen buttons like “Sign in with Google” on many websites: developers use the API provided by Google to retrieve the information about you that Google stores (and makes accessible).
For web APIs, HTTP methods are essential. Each of them serves a specific purpose. The most important ones are:
- GET – used to retrieve information from the server
- POST – mainly used to create a record or trigger an action
- PUT – used to update existing data
- DELETE – removes the given item
These methods don’t differ much apart from their names – the actual implementation happens on the server. So, if you decide to program your server in such a way that a DELETE request creates things, that’s technically your choice – but users and other developers reading your code won’t be too happy about it. Therefore, it’s best to stick to what’s expected of each method and use them according to their intended purpose.
Request structure
All HTTP methods except GET can send additional information to the server (called the body). The body contains data that directly relates to the specific request — for example, when creating a new record in a database, the body includes exactly the data that should be saved.
However, the server also needs various operational details — for instance, what format the data is in, or what cookies the user currently has set. This is where headers come in. HTTP defines a large number of headers, and they differ depending on whether they belong to a request, a response, or can be used for both. Below is a list of the most commonly used ones. If you’re interested in detailed information, definitely check the documentation.
Accept– specifies the type of data expected in the response`
Content-Type– indicates the type of data currently being sent
User-Agent– identifies the sender of the request (for example, when sending from a browser, it contains details like the browser type and version)
Authorization– contains the authorization information required by the server (for example, when sending a request to an API that requires an access key)
Cookie– includes the cookies the user currently has
Set-Cookie– sent by the server to tell the browser to set specific cookies for the user
In the case of GET requests, you can specify details through query parameters. These are the parts that appear in a URL after a question mark. For example, in YouTube video links, you’ll often see a query parameter like ?v=VIDEO_ID, which tells the site which specific video you want to watch.
Status codes
Every request must return a numerical status code in its response. These codes are divided into the following categories:
- Informational (100–199)g
- Successful (200–299)
- Redirection (300–399)
- Client error (400–499)
- Server error (500–599)
These codes make it easy to quickly determine what went wrong (or right) during the processing of a request. For example, if you receive an error with code 400, you’ll know that something is wrong in your own code. However, the exact implementation depends on the server, so it’s a good idea to look through the documentation. Or, if you prefer a lighter overview, you can check out the simplified list of the most common status codes, illustrated with cats.
Example of a typical API
Let’s say we have an information system for a library. This library wants to cooperate with other libraries to share and update information. For basic CRUD (Create, Read, Update, Delete) operations on the book database, the following endpoints would be created:
GET /book
POST /book
GET /book/:id
PUT /book/:id
DELETE /book/:id
Notice that in the last three endpoints I used the notation :paramName — this is called a path parameter. In short, it’s used when we want to work with dynamic content. For example, when dealing with different books, we don’t have to specify the book ID in every request manually. Instead, we can create a single logic that retrieves the relevant piece of information (in this case, the book ID) directly from the request path.
In this case, we can simplify the logic and structure of the API as follows:
/bookis used for working with the entire collection of booksGETreturns all books in the databasePOSTcreates a new book
/book/:idhandles requests related to a specific bookGET,PUT, andDELETEwill retrieve, modify, and delete the book identified by the ID provided in the request path
Documenting API with OpenAPI
Writing documentation is a time-consuming process, and from the previous section, you’ve probably realized it’s not exactly fun. That’s precisely why some clever folks came up with a specification called OpenAPI, which defines a machine-readable way to describe the functionality of individual parts of a web API.
With this file, various tools can then work automatically — for example, you can have the documentation displayed in a user-friendly format using Scalar. Take a look at the schema I created for the library API in the previous section. A raw JSON file might not tell you much, but if you upload it to Scalar, it will neatly list everything you need to know: which API endpoints are available, what they return, and with which status codes.
My example schema is very minimal; you could add many other things, such as text descriptions of individual endpoints, more status codes, or definitions of security elements (like handling the previously mentioned Authorization header).
Creating an API schema is therefore very important — especially if you plan to make your API available to others who aren’t familiar with your code. Moreover, many web frameworks can generate this schema automatically, saving you a lot of work.
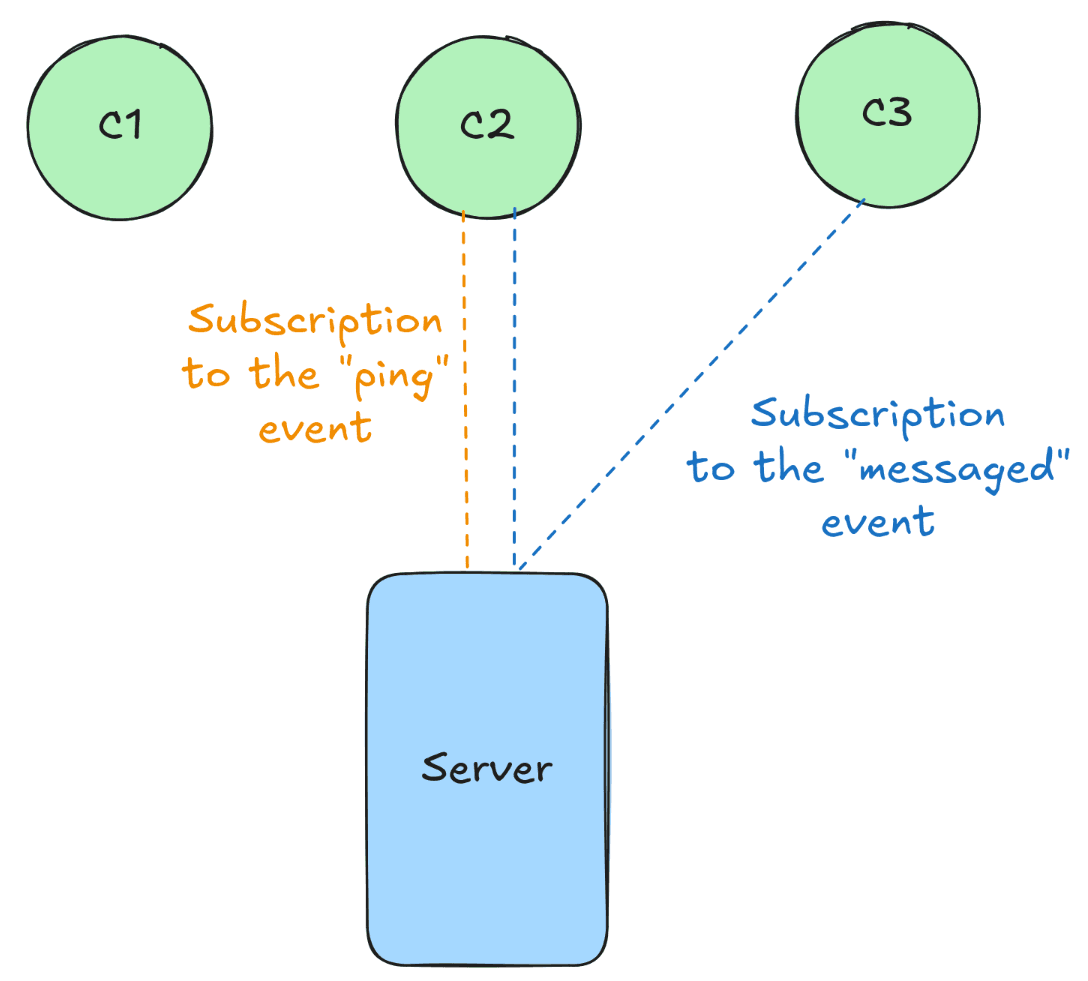
Server-sent events: sending data to multiple clients at once
SSE is useful in situations where we want to send information to multiple clients simultaneously. For example, if we had a chat page, we could use SSE to send all connected users a notification about a new message.
Working with SSE is quite straightforward: all you need is a server (the “sender”) and one or more clients (the “receivers”). The server can send messages or define its own types of events, which clients can then listen to. Of course, a single client can listen to multiple event types at once.
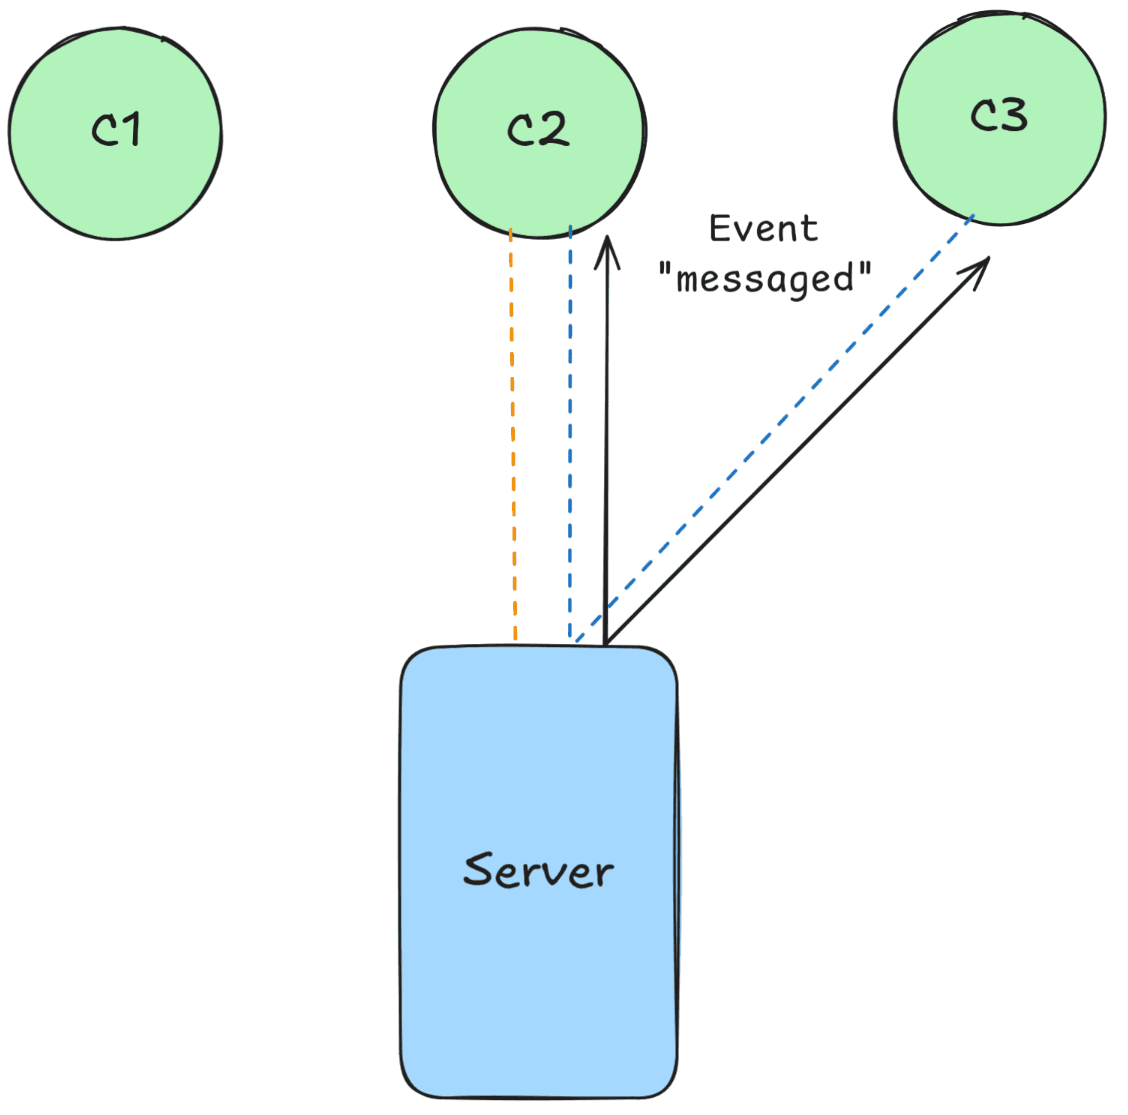
The server must trigger the sending of an event on its own. For instance, it might make sense to send an event named messaged whenever a user creates a new message.
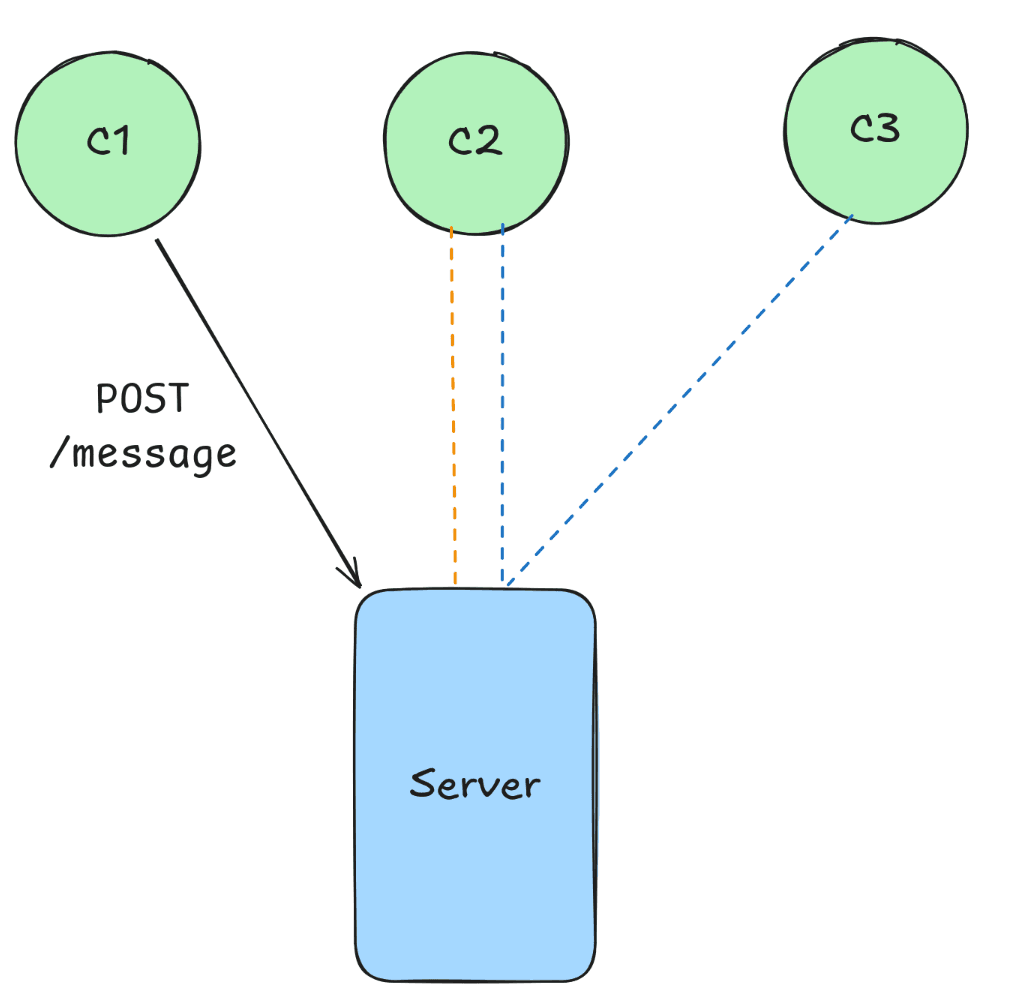
The server now sends the messaged event to all connected clients. If any of them are currently subscribed to this event, they can then handle it in their own code.
Unlike HTTP requests, SSE are one-way — meaning that when a client receives an event, it cannot send a response back to the server.
© 2025 Student Cyber Games, z.s. – Released under the CC BY-NC-SA 4.0. license