

When you have finished coding and want to upload your changes to your team's repository using git push, you may see a message like this:
! [rejected]       main -> main (non-fast-forward)
error: failed to push some refs to 'https://github.com/your-tda-name/your-tda-repository.git'
hint: Updates were rejected because the tip of your current branch is behind
hint: its remote counterpart. If you want to integrate the remote changes,
hint: use 'git pull' before pushing again.
This means that one of your colleagues managed to upload a change that you do not have locally. To combine the changes, you first need to download them using git pull. Git will try to combine the changes automatically, but if it cannot, you will see this:
Auto-merging index.ts
CONFLICT (content): Merge conflict in index.ts
Automatic merge failed; fix conflicts and then commit the result.
If you have not worked with Git before, you may then see another message:
hint: You have divergent branches and need to specify how to reconcile them.
hint: You can do so by running one of the following commands sometime before
hint: your next pull:
hint:
hint:   git config pull.rebase false  # merge
hint:   git config pull.rebase true   # rebase
hint:   git config pull.ff only       # fast-forward only
hint:
hint: You can replace "git config" with "git config --global" to set a default
hint: preference for all repositories. You can also pass --rebase, --no-rebase,
hint: or --ff-only on the command line to override the configured default per
hint: invocation.
fatal: Need to specify how to reconcile divergent branches.
Git needs to know how you want to perform the merge after downloading the changes, because there are essentially three ways to do it.
When there are no significant changes on the given branch, Git performs a fast-forward automatically, so you do not need to do anything. In other cases, you can use a merge commit or a rebase. You can learn about the differences between them here.
For now, it is enough to know that rebasing can be more complicated, so for the rest of this article I will use merge. You can configure it using the command git config pull.rebase false (or add --global after config if you want to set it as the default) and then try git pull again.
Manually Resolving a Conflict
When you open the file where the conflict occurred (either because of the previous scenario or because of a regular merge of another branch), you will see that its contents have been changed to something similar to this:
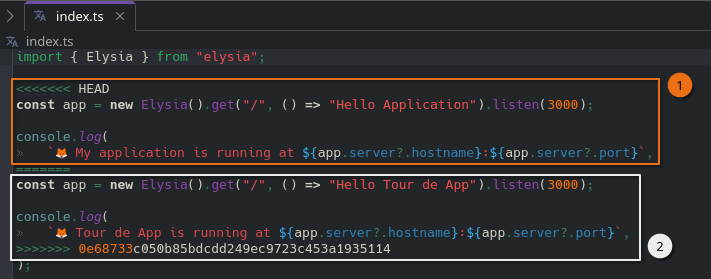
Git has marked the conflicting sections and placed side by side the changes you currently have locally (1) and the changes you are trying to download (2). Manually resolving the conflict means rewriting the file so that it contains exactly what you want to have in the final version.
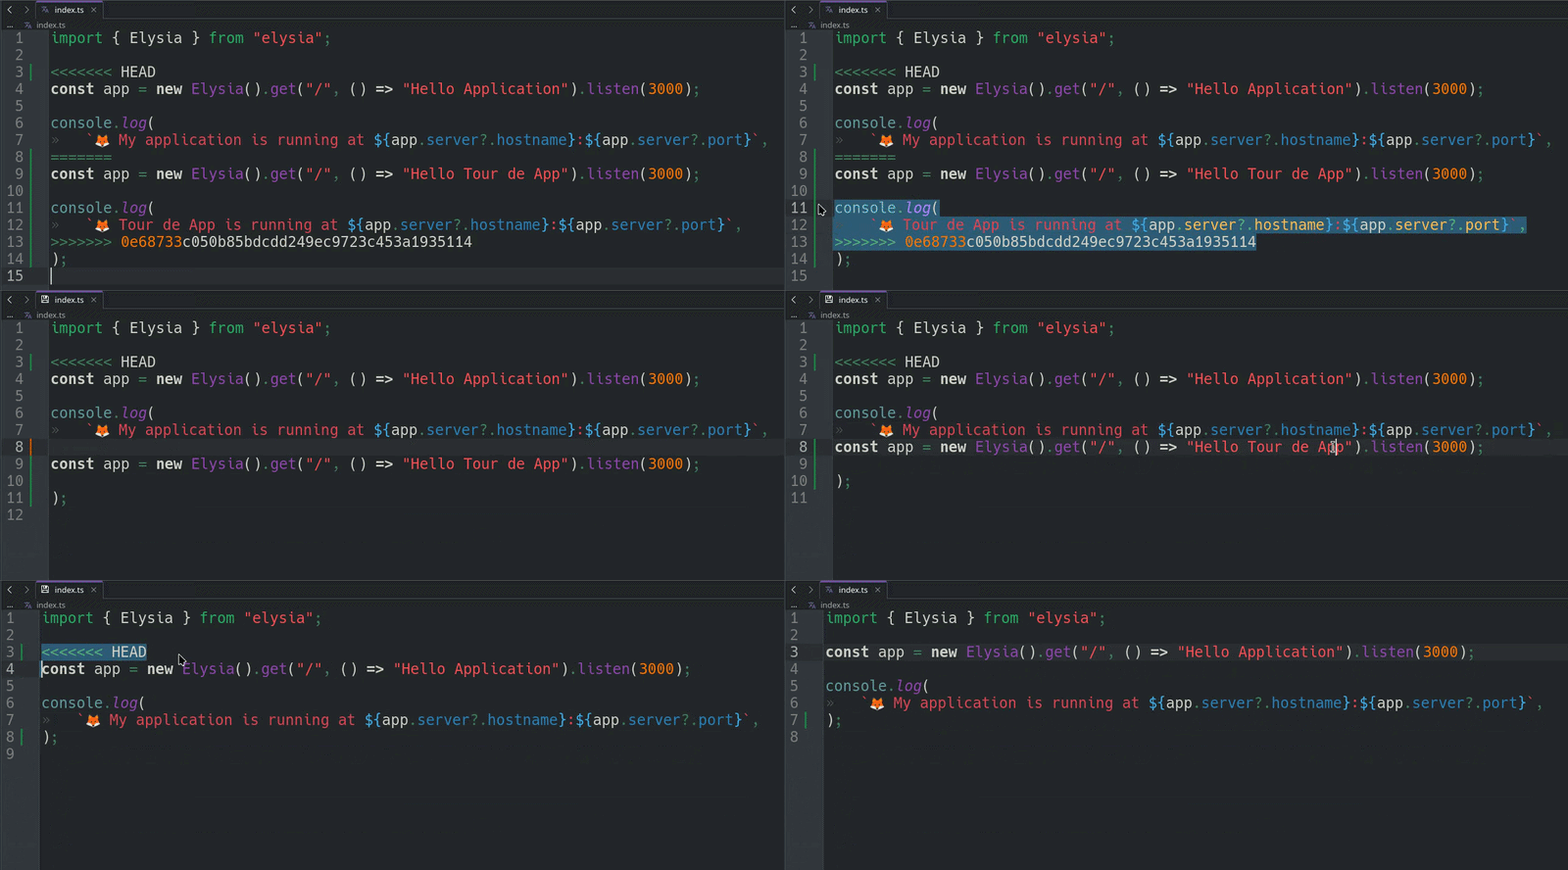
Once you are finished, all you need to do is add the changes to the staging area (git add file_name), create a commit (git commit -m "message"), and upload it back to the repository (git push).
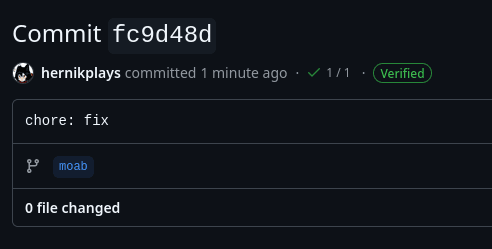
When you look at your repository, you will see that the latest change is your latest commit. Since it is a merge commit, it will appear empty (0 changed files), but your changes are now ready for the rest of your team to download.
GUI Tools: Making Your Life Easier
This conflict was simple enough to solve manually, but in larger projects, you may accidentally encounter dozens of conflicts at once. Nobody wants to resolve seventy conflicts spread across several files and manually enter all the changes.
Luckily, there are many tools that can help you work with these conflicts. One of them is built directly into VS Code, which you may already be using for development.
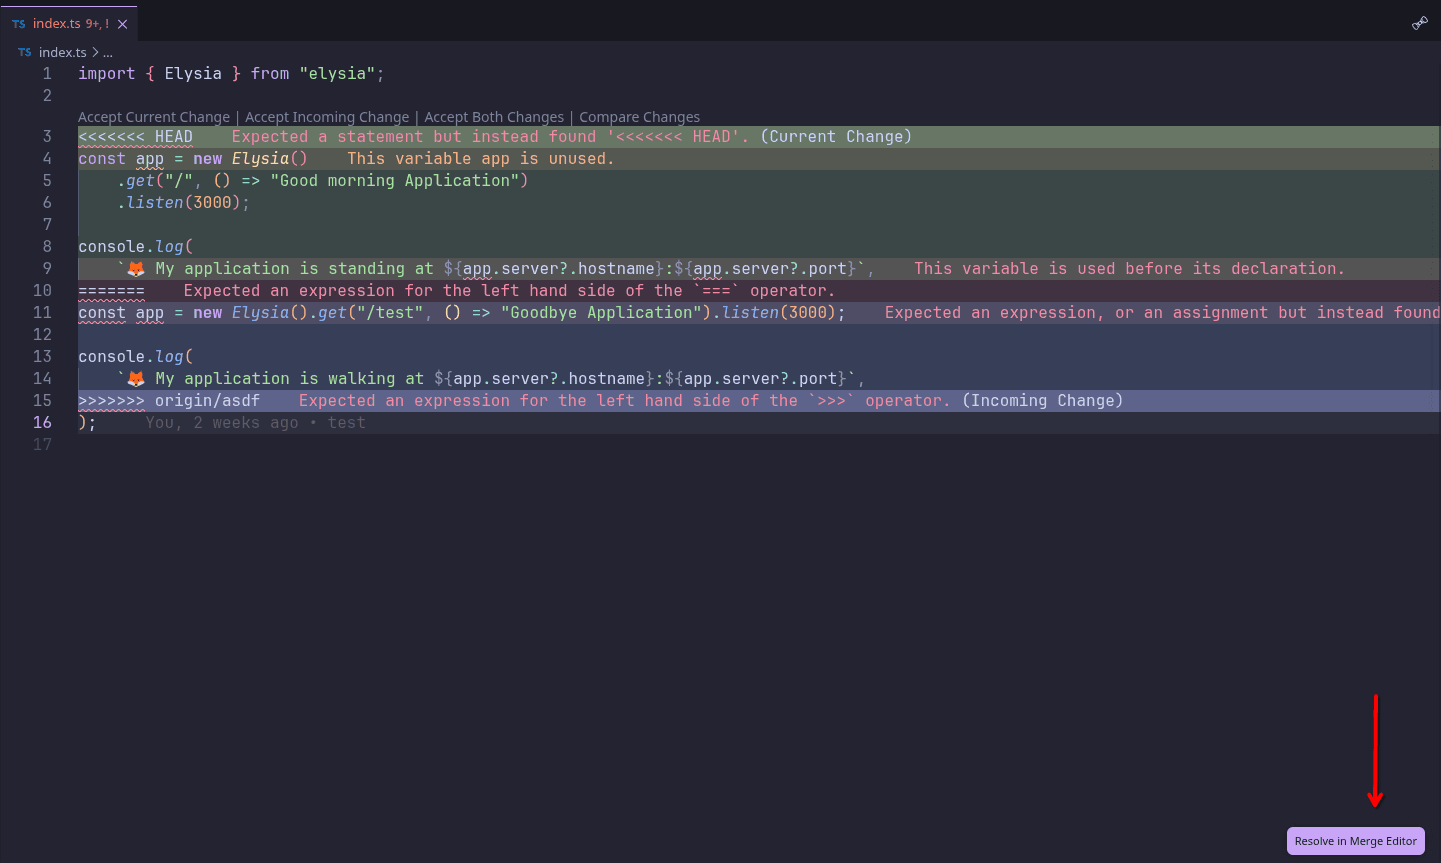
When a conflict occurs, VS Code highlights the file for you. That is useful, but the real fun begins when you open the Merge Editor.
Here you can see the incoming changes that you are about to download into the current branch (1) and your current changes on that branch (2) side by side. In the lower half, you can see the result of your merge (3).
On the right side of the screen, you can see how many conflicts still need to be resolved. Clicking on the number takes you directly to the next conflict in the code.
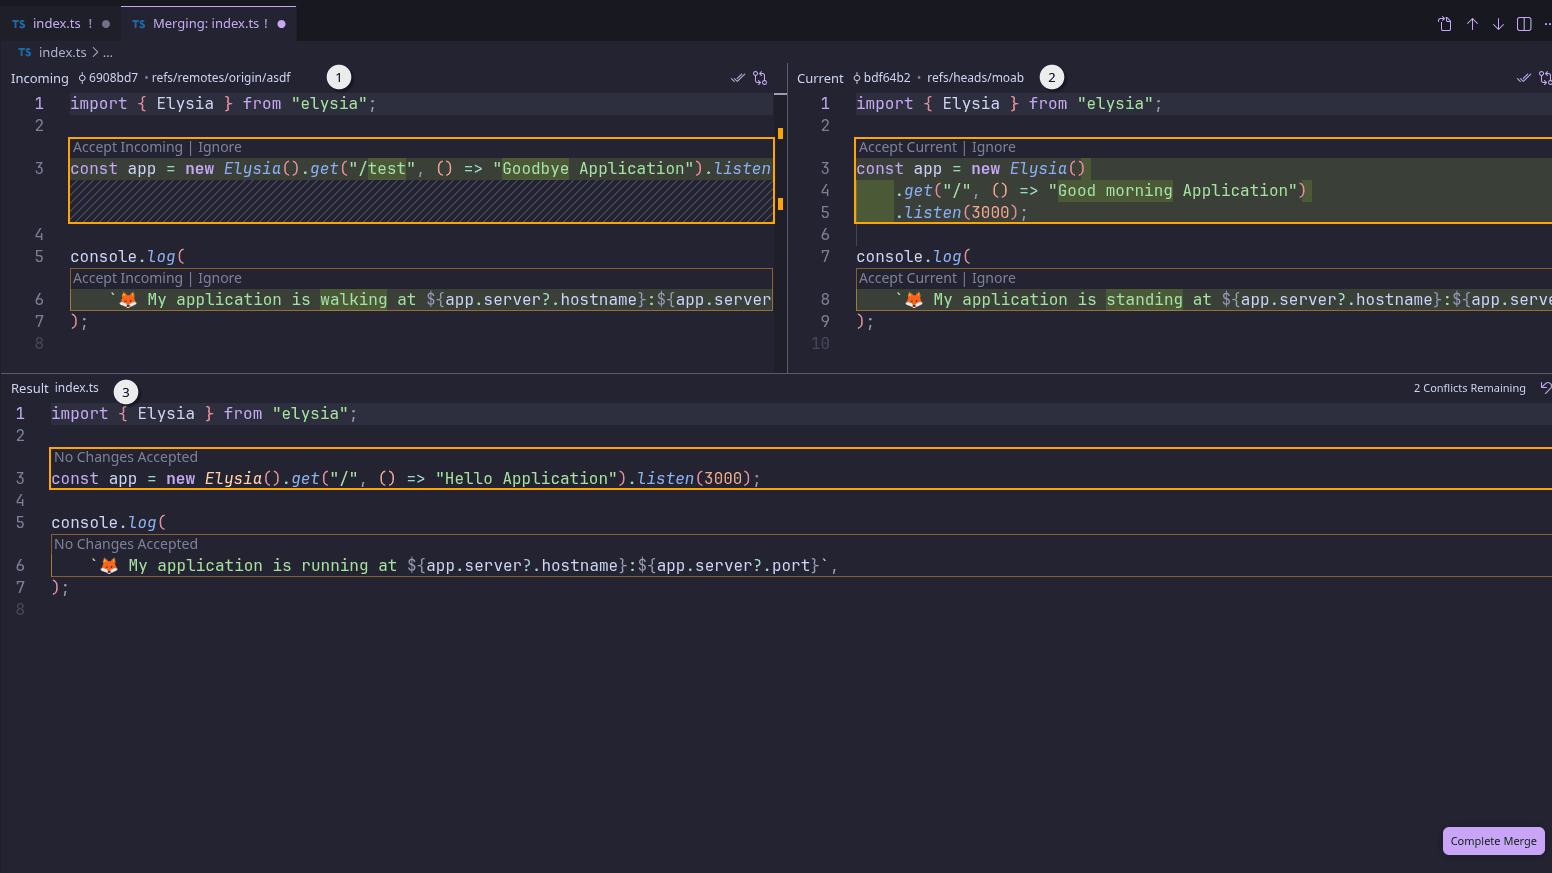
Above each conflict, you will see the buttons “Accept Incoming / Current” and “Ignore”.
If you click “Ignore”, the conflict stops being highlighted, and you can resolve it manually just as you would in the previous section. Simply start typing into the result window (3 in the previous image).
When you click “Accept Incoming”, the incoming change is prepared for writing (in window 1 above). When you click “Accept Current”, your current local change is used instead (in window 2 above).
In some cases, you may also see an “Accept Combination” button. When clicked, the Merge Editor attempts to combine both changes so that they do not overwrite each other. However, this can sometimes duplicate parts of the code, so make sure to check the result before sending it out.
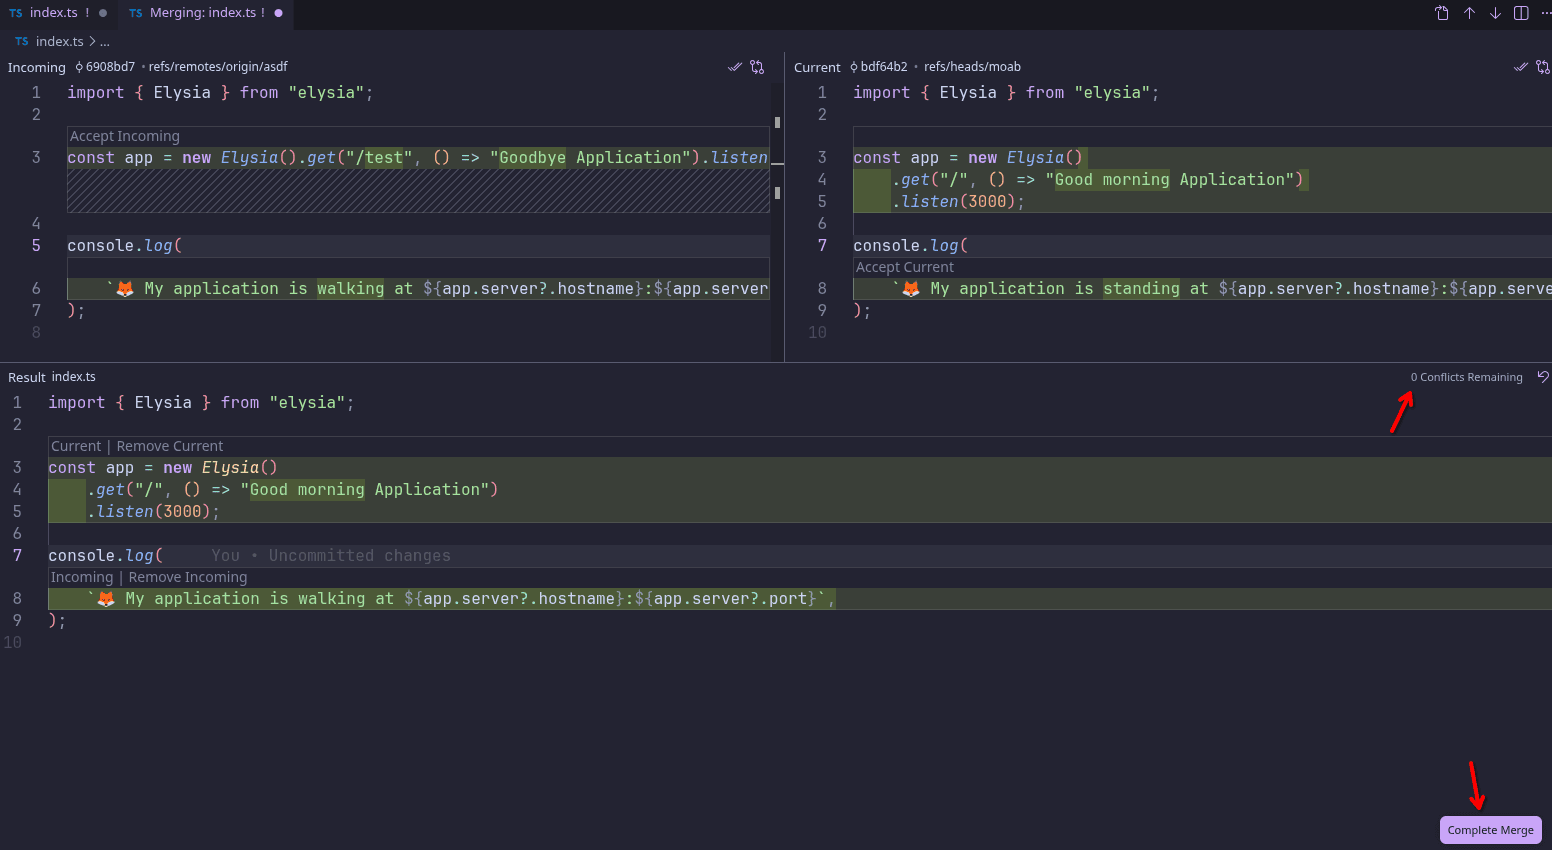
Once you are happy with your conflict resolution and the conflict counter is back to zero, you can click “Complete Merge”. VS Code will prepare a merge commit for you in the Source Control tab (the left panel with the Git icon, or Ctrl+Shift+G). You only need to click “Continue”, and you are done.
Now nothing is stopping you from creating, so go ahead and enjoy coding!
© 2026 students can grow, z.s. – Released under the CC BY-NC-SA 4.0. license