

A consistent environment, everywhere and always
Docker performs what’s called containerization of your code — it packages your entire project into a container, which is essentially a virtualized operating system where your application runs isolated from the other processes on your computer.
Getting started
Before we install Docker itself, it’s necessary to first install Windows Subsystem for Linux (WSL). Since Docker was originally developed primarily for UNIX systems, its support for Windows is somewhat limited. Microsoft solved this by introducing WSL, which allows Docker to work on Windows just as it does on Linux.
You can easily install WSL by opening the command prompt in administrator mode (search for cmd, right-click it, and select “Run as administrator”). Then enter the command wsl --install and follow the instructions.
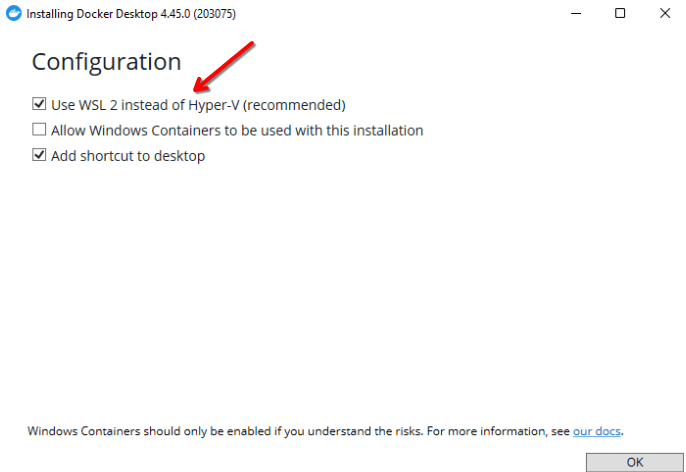
Once the WSL installation is complete, download and install Docker Desktop.
Get your application into a container
Now that you have Docker installed, you need to prepare what’s called a Dockerfile — a file that contains instructions on how your application should be built. If your application consists of multiple parts (for example, a front-end and a back-end), ideally you’ll want to create several different Dockerfiles and then deploy them using Docker Compose (more on that below).
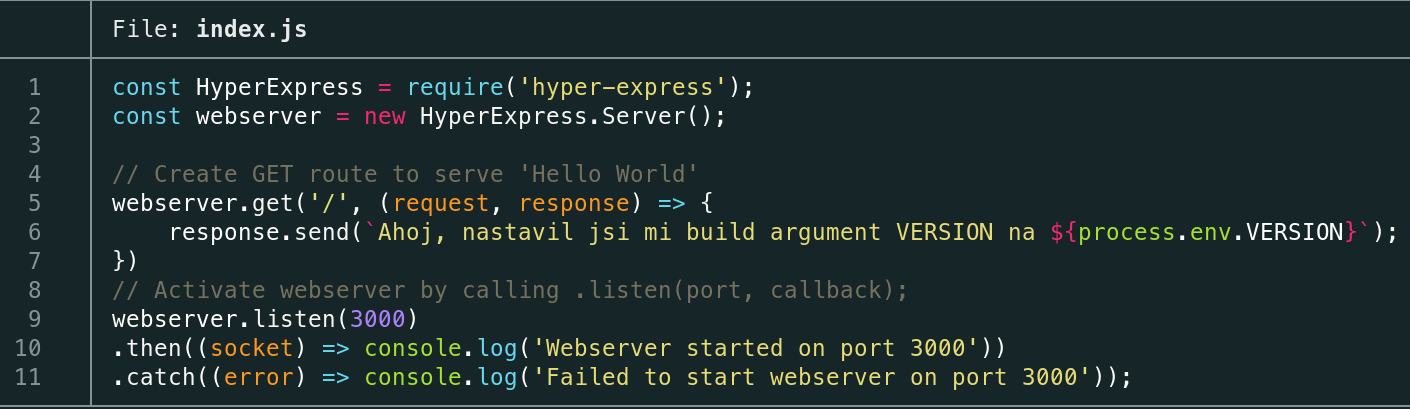
As an example, I’ll use a project written with Node.js. In my project, I have a simple web server that listens on port 3000:
At the beginning of every Dockerfile is the definition of a base image. That’s an operating system of some kind; however, there are many images that already come with the tools you use preconfigured — just check Docker Hub. For Node.js, for example, I’ll use the official Node.js image. With the FROM keyword you specify the image name and, after a colon, the tag — e.g., the version of the given tool. You can find available tags on the page of the Docker image you want to use.
FROM node:22Now we can specify some variables that will be inserted into the environment variables of our container. In Node.js, the NODE_ENV variable is used to indicate whether we’re working in a development or production environment. In the example, I’ll set it to production using the ENV keyword. Variables are always provided in the form key=value, so on the next line I’ll add:
ENV NODE_ENV=productionYou definitely don’t want to insert private data here, such as API keys. We’ll look at how to insert such keys correctly later..
If you want to be able to change certain values at build time, you can use arguments. For example, if you wanted to specify your application version during the build, you would insert:
ARG ARGUMENT_NAMEWithin the Dockerfile you can then reference it with $; here you would therefore use $NAZEV_ARGUMENTU.
By default, Docker works in the system’s root directory, i.e., the folder with all system files. To create our own folder for the project, use the WORKDIR keyword. It creates the folder if it doesn’t exist and switches to it immediately.
WORKDIR /appWith the COPY keyword you tell Docker which files and folders to copy into the container. Docker can only copy folders within the current context; by default that’s the folder where the Dockerfile is located, though this can be changed at build time. On one line you can list all the files you want to copy; as the last item, provide the path where the files should be placed in the container:
COPY index.js package.json package-lock.json /appThe most important keyword is RUN. With it you execute the commands needed to prepare your project for launch. I’m deliberately saying “prepare,” because a different keyword is used for actually starting it. For example, in Node.js you need to install the used libraries via the package manager:
RUN npm install> Note: Depending on the image you use, some tools may be missing. However, you can always install them via the package manager of the system your image uses. You’ll always find this in the documentation of the given image on Docker Hub.
For actually starting your application’s process, the keywords ENTRYPOINT and CMD are used. ENTRYPOINT is mainly used when you want to use the container as an executable tool, which we don’t need here, so CMD will suffice. You can find the potential difference between these keywords here.
For system compatibility, it’s recommended to provide the command not as text, but as a list. My application starts with the command node index.js, so in the Dockerfile I’ll write:
CMD ["node","index.js"]Lastly, we have to tell Docker to expose the port where the application runs. My application, as you can see in the code, runs on port 3000. I’ll therefore use the EXPOSE keyword to have Docker expose it.
Tip: this is an ideal place to use variables and arguments.
EXPOSE 3000And the Dockerfile is ready; now we just need to build the entire project.
FROM node:22

ARG VERSION
ENV VERSION=${VERSION}

WORKDIR /app
COPY index.js package.json package-lock.json ./

RUN npm install

CMD ["node","index.js"]
EXPOSE 3000
Build
The build is done simply with the docker build command.
docker build . -t tda-app --build-arg VERSION=1.0The dot tells Docker that it can find the Dockerfile here; the -t argument lets you name the resulting image. If you use arguments (ARG), you can now set their value with the --build-arg option, where you provide the argument in the form KEY=value, where the key must match the argument you defined.
To test that the built application works as it should, we’ll start the application with the command
docker run -p 3000:3000 tda-app:latestThe -p option takes the port from the application (the one after the colon) and maps it to a port on your computer (before the colon). At the end, just provide the image name we used during the build, followed by :latest, which tells Docker to use the latest version of this image. Now you can open http://localhost:3000 in your browser and see if the application is running.

Safety first
By default, Docker uses the root user (i.e. the system administrator) inside the container. Even though this is only a virtual container that cannot interfere with the system (unless you connect folders via volumes), it is good practice to set up a different, non-administrative user immediately after completing all administrative operations (e.g., software installation). The USER keyword is used for this purpose; you only need to specify the name of the new user. However, we must first create it, so we will modify our existing Dockerfile as follows:
FROM node:22

ARG VERSION
ENV VERSION=${VERSION}

RUN useradd -ms /bin/bash myuser
RUN mkdir /app && chown myuser:myuser /app
USER myuser

WORKDIR /app
COPY --chown=myuser:myuser index.js package.json package-lock.json ./

RUN npm install

CMD ["node","index.js"]
EXPOSE 3000- The
useraddcommand creates a new user that we will use to run the application.
- The
mkdircommand creates the application folder so that we can then assign it to our user with thechowncommand. Without this, the folder would be owned byrootand our user would not be able to work with it.
- We switch to our user with the
USERkeyword.
- We add
--chown=...afterCOPY, which automatically sets the ownership of the copied files to our user so that they can continue working with them.
If we want to add secret keys, we can add them to the container when starting via docker run using the --env parameter if we want to set one variable, or --env-file if we want Docker to load the variables from a file.
docker run --env VERSION=1 -p 3000:3000 tda-aplikace:latest

# OR, if we have a file to load from:

docker run --env-file .env -p 3000:3000 tda-aplikace:latest
Overview of keywords
In the table below you’ll find an overview of the keywords used above in the Dockerfile. Definitely check the official documentation as well — it will tell you even more.
| Keyword | Description | Example usage | Explanation of usage |
|---|---|---|---|
| FROM | Defines which image should be used | FROM node:22 | Uses the Node.js image from Docker Hub with the tag 22 |
| ARG | Allows you to set an argument that can be changed during build | ARG HELLO_WORLD | Defines an argument named HELLO_WORLD |
| ENV | Defines a variable that will be inserted into the container environment | ENV HELLO=world | Sets an environment variable named HELLO with the value world |
| WORKDIR | Changes the working directory; if the path doesn’t exist, it creates it | WORKDIR /app | Changes the working directory to /app |
| COPY | Copies files from the system into the container | COPY index.js code /app | Copies the file index.js and the folder code from the system into the /app directory inside the container |
| RUN | Executes a command inside the container | RUN echo "Hello world" | Runs the given command during the build process |
| CMD | Defines the command that runs when the container starts | CMD ["node", "index.js"] | Executes the given command when the container is started |
| EXPOSE | Exposes a container port | EXPOSE 3000 | Exposes port number 3000 |
| USER | Switches the current user | USER myuser | Switches to the user myuser. This user must be created upfront! |
© 2025 Student Cyber Games, z.s. – Released under the CC BY-NC-SA 4.0. license