


Request and Response
Both requests and responses follow a specific format that services use. Here is an example of a request to create a user:
POST /api/users HTTP/1.1
Host: example.com
User-Agent: Mozilla/5.0
Accept: application/json
Content-Type: application/json
Content-Length: 71

{
  "name": "Jan Novák",
  "email": "jan.novak@example.com",
  "active": true
}
You can see a lot of information here. If you break it down, you will find that it is not actually that complex:
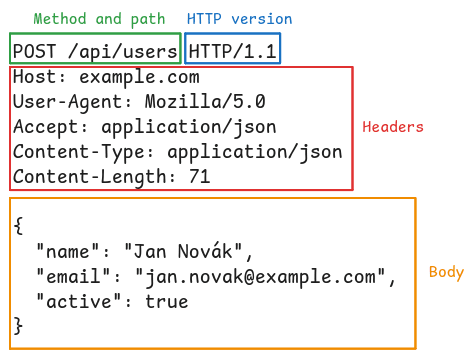
- Method – determines the type of operation the request should perform. The basic ones include:
- GET – to retrieve data; the request does not contain a body.
- POST – to create new data.
- PUT – to modify data; the data from the request replaces the existing content.
- PATCH – to partially modify data; fields that should remain unchanged can be omitted.
- HTTP version – usually irrelevant to us, as the HTTP server and client manage it themselves.
- Headers – usually contain “metadata” and are not used to transfer the actual data. In the example, we can see
Content-Type, which is used to specify the format of the content (JSON in this case), and for exampleUser-Agent, which the HTTP client sets to identify the client (Mozilla/5.0in this case probably means that it was a web browser). - Body – when the request is used to modify or upload data, a body is present in most cases. It is in the format specified by the previously mentioned
Content-Typeheader.
Now we come to the second part of our HTTP communication: the response:
HTTP/1.1 201 Created
Content-Type: application/json
Location: /api/users/1024
Content-Length: 118

{
  "id": 1024,
  "name": "Jan Novák",
  "email": "jan.novak@example.com",
  "active": true,
  "createdAt": "2026-09-06T14:32:00Z"
}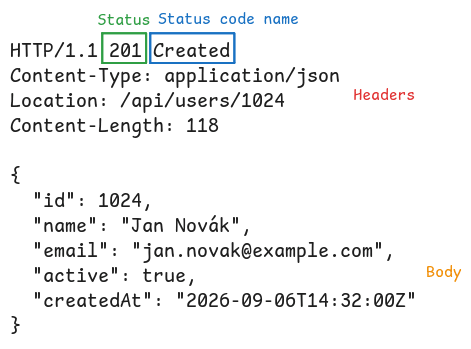
The response is quite similar to the request, so I have highlighted the status and description of the status code, which are the most important parts for us:
- Status – indicates the result of the request. It is usually represented by a number. You do not need to memorize what every status code means (although after some time, some of them will probably stick in your memory anyway – 200, 201, 400, 404…), but it is important to at least remember the ranges that determine the result:
- 200–299 – success
- 400+ – error, etc.
- Short status description – is associated with the status and is basically a short textual representation of the numerical code (so
201– Created).
Now that we have explained how a request works, let’s try programming it.
Example in TypeScript
In this example, we will use the Elysia library to create a simple API for creating a user:
import { Elysia, t } from 'elysia'

const app = new Elysia()
  /* Create a new endpoint (a place for processing a request) for the POST method.
     When creating an endpoint, we can have multiple methods on the same path. */
  .post(
    '/api/users', // The path where our API will be, usually with the /api prefix
    ({ body, set }) => { // Process the request
      const name = body.name; /* .name .email .active */;
      set.status = 201; // Set the resulting status
      set.headers['Location'] = `/api/users/${newUser.id}`; // Set the "Location:" header
    },
    { // Validate the request body
      body: t.Object({
        name: t.String({ minLength: 1 }),
        email: t.String({ format: 'email' }),
        active: t.Boolean()
      })
    }
  )
To then call our API from the client, we can use the Eden library for Elysia:
// Before: npm add @elysiajs/eden
export const api = treaty<typeof app>('localhost:3000' /* Address of our API */);

const { data, error } = await api.api.users.post({
  // Simulates a POST request to /api/users with a body
  // (it is automatically typed according to the app instance):
  name: 'Jan Novák',
  email: 'jan.novak@example.com',
  active: true
})

if (error) { // The operation did not end with a 200–299 status
  // error.value contains the typed error (e.g. a validation error)
  console.error(error.value)
  return
}
References
- Status code overview: https://developer.mozilla.org/en-US/docs/Web/HTTP/Reference/Status
- HTTP overview on the web: https://developer.mozilla.org/en-US/docs/Web/HTTP
- Elysia – overview: https://elysiajs.com/at-glance.html
- API security using a bearer token: https://blog.postman.com/what-is-a-bearer-token/
- Elysia.js – Bearer token: https://elysiajs.com/plugins/bearer
© 2026 students can grow, z.s. – Released under the CC BY-NC-SA 4.0. license